
USB Quantum Sensor Software Support
These update instructions are for SQ-420 Sensors with a serial number less than 1258.
If your sensor is no longer working after an automatic update, click here >
Click here for BTM300 update instructions >
SQ-420 Update Instructions (Serial Number less than 1258):
Steps performed:Uninstall the old software, install the new software, update the sensor firmware. If needed uninstall the HDI device and install a new driver.
Important things to know before beginning update process:
- The sensor firmware can only be updated on a Windows based PC or tablet, after updating it will work on both Windows and Mac.
- After installing the new software, in order to update the firmware, the sensor needs to be plugged in BEFORE the newly installed software is opened for the firmware update prompt to appear.
- 在更新固件之前,请在校准乘数和偏移量下写下。This can be found by plugging in your sensor, opening the current software, and navigating to the calibration window. If you don’t have a previously installed copy of the software, do not worry about writing this information down.
Update Instructions:
Step 1:Download the ApogeeConnect setup file to your computer, this should default to your downloads folder.Click here to get the latest software version >
Step 2:如果可以,请使用控制面板卸载当前USB量子软件,它应该名为“SQ420”。
Step 3:Run the downloaded setup file (from Step 1) to install the new software, following the prompts.
Step 4:If the software is open after installation, close the software, then plug in your SQ-420 sensor.
Step 5:Start the software, which will result in a pop-up window prompting you to update the firmware in your sensor, please do so. *Select the SQ420_V2.txt from the file dialog box. (Note, for sensors with a serial number greater than 1258 should the latest version. As of Feb. 2nd, 2017 this is SQ420_V7.txt.)
*If your computer says USB Device not recognized you need to install drivers
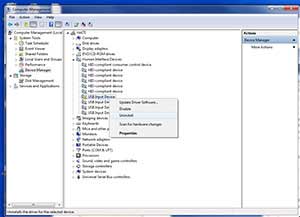
Please open your device manager, which should have a com port device “SQ-420” with a yellow box and an “!.” If this is not present, please unplug your sensor for 3 seconds, then reconnect. Right click this device and select “Update Driver Software,” then “Browse my computer for driver software.” Navigate to the ApogeeConnect folder, then the select the “driverlib” folder. Click next, and the driver should install properly.
Step 6:Start the ApogeeConnect software and enter the 4 digit serial number of your sensor into the pop-up window (found on the white label 6-12” from the USB plug). The sensor should begin working in a few seconds, and the “Device Connected” indicator will turn green and show the serial number.
NOTE: To use additional devices, open a second ApogeeConnect software window, plug in the additional sensor, and enter the serial number into the prompt.
如果您遇到这些说明或传感器仍未进行测量的任何困难,请联系techsupport@apogeeinstruments.com.
If you experience problems with Apogee software, please fill outthis formso our engineers can address the issue as soon as possible.
These update instructions are for SQ-420 Sensors that are no longer working after an automatic update:
Step 1:从屏幕左下方的左下方的齿轮图标开始,从传感器连接和软件打开,导航到校准窗口。
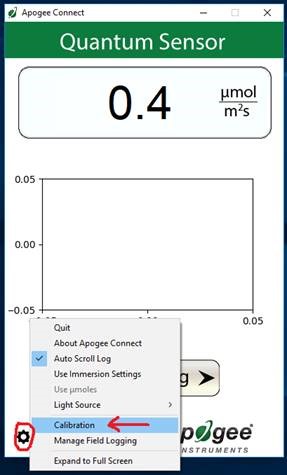
Step 2:Type "FACTORY" into the Multiplier field and press the enter/return key on your keyboard. The calibration factor will reappear and the greyed out "Update Firmware" button will become available.

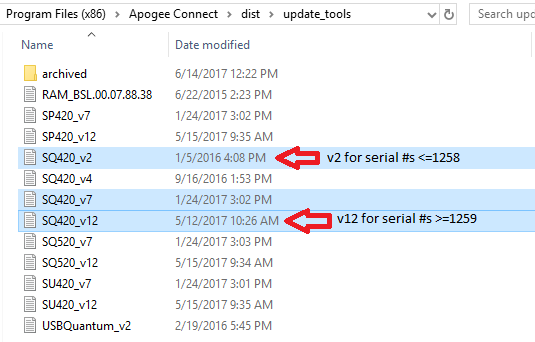
Step 3:点击“更新固件”按钮。一个文件选择window should open. Firmware files are located in the directory location where Apogee Connect is installed (on our machine, this is: C: Program Files (x86)\Apogee Connect\dist\update_tools). If the serial number of you SQ-420 is 1258 or below, select the "SQ420_V2.txt" from this directory location. If your serial number is 1259 or higher, select "SQ420_v12.txt", and follow the prompts. (Note that if you install v12 are still having trouble after completing these steps, go back through and try v7)
Step 4:Firmware is now updated and sensor should be working correctly.
These update instructions are for BTM3000 Sensors with a serial number less than 1430.Click here to update SQ-420 >
BTM3000更新说明(序列号小于1430):
BTM 3000 Software & Firmware Update Instructions
Steps performed:Uninstall the old software, install the new software, update the sensor firmware, install the new driver, set offset to zero.
Important things to know before beginning update process:
- The sensor firmware can only be updated on a Windows based PC or tablet, after updating it will work on both Windows and Mac.
- After installing the new software, in order to update the firmware, the sensor needs to be plugged in BEFORE the newly installed software is opened for the firmware update prompt to appear.
- 在更新固件之前,请在校准乘数和偏移量下写下。这可以通过插入传感器,打开原始BTM3000软件,并导航到“动作”下拉的校准窗口。如果您没有先前安装的软件副本,请不要担心向下写入此信息。
Update Instructions:
Step 1:Download the BTM3000 setup file to your computer, this should default to your downloads folder.Click here to get the latest software version >
Step 2:If needed: Uninstall the original software using the control panel, it should be named “BTM3000.”
Step 3:Run the downloaded setup file (from Step 1) to install the new software. During the installation you will be prompted to install a driver, please do not install the driver.
3B。如果先前或事故安装了新驱动程序,请按照以下步骤删除它:导航到您的设备管理器,展开“端口:COM&LPT”部分,右键单击并卸载传感器,确保选中该框从计算机中卸下驱动程序,最后断开并重新连接传感器。
Step 4:If the software is open after installation, close the software, then plug in your BTM3000 sensor.
Step 5:Start the software, which will result in a pop-up window prompting you to update the firmware in your sensor, please do so. A file selection window should open for your to select your firmware, please select "USBQuantum_v2.txt" from the file dialog box.
NOTE: On some system configurations the first firmware update attempt does not open this window and appears to update the sensor, which prompts you to disconnect and reconnect your sensor. Please disconnect your sensor, close the BTM3000 software, The second attempt will open the file selection window and the update will be successful.
Step 6:The new driver now needs to be installed in order to connect your sensor. There are two methods to do this:
Option 1 (Our preferred method):导航到设备管理器,展开“端口:COM&LPT”部分,右键单击设备(它将显示为USB串行设备或类似的内容,如果您不确定它是哪个设备,请断开传感器并观看重新连接的列表),单击“更新驱动程序软件”,选择“浏览我的计算机”,然后导航到包含驱动程序的文件夹。Windows负责休息。
选项2:驱动程序文件位于已安装的BTM3000文件夹中的“DriverLib”子文件夹中;“C:\ Program Files(x86)\ btm3000 \ driverlib”是Windows 7和10的默认路径。要将驱动程序安装到计算机上,请打开驱动程序安装向导“dpinst.exe”(参见下面突出显示)。将驱动程序安装到计算机时需要大约10秒钟(注意:它尚未与您的传感器相关联)。

Unplug your sensor, wait 3 seconds, plug in your sensor. The device driver software should attempt to automatically install, with a notification in the bottom right.
If this doesn't happen or is unsuccessful you can manually associate the sensor with the driver. To do so, navigate to the device manager, which should have a COM port device with a yellow box and an “!.” If this is not present, please unplug your sensor for 3 seconds, then reconnect. Right click this device and select “Update Driver Software,” then “Browse my computer for driver software.” Navigate to the BTM3000 folder, then the select the “driverlib” folder. Click next, and the driver should install properly.
Step 7:Start the BTM3000 software and enter the 4 digit serial number of your sensor into the pop-up window (found on the white label, approximately 6-12” from the USB plug). The sensor should be connected in a few seconds. A “Device Connected” indicator at the bottom of the software will turn blue and show the serial number. The reading displayed should be stuck at zero regardless of the amount of light on the sensor, proceed to step 11. If your reading displayed is frozen at a large value in the 4000 or 5000 range, you accidentally installed the wrong firmware, please see step 12 below.
Step 8: **CRITICAL FINAL STEP**The offset from the original calibration must be reset to start making measurements. Navigate to the calibration window using the gear icon in the bottom left. Erase the number value in the multiplier field, type “FACTORY” into the field and press the enter/return key on your keyboard (the calibration factor will reappear and the greyed out section below will become available). Being careful to not change the calibration factor, change the offset to 0.0, check the box to overwrite the factory calibration, and click save. The displayed reading should now be reading properly. Office lights are typically 7-15 PAR, in-tank measurements are typically between 50 and 400 PAR.
You're all done, thank you for updating your sensor!
如果您遇到这些说明或传感器仍未进行测量的任何困难,请联系techsupport@apogeeinstruments.com. If you experience problems with Apogee software, please fill out this form so our engineers can address the issue as soon as possible.
Step 9:这一步是只需要如果你的传感器stuck reading a high PAR value in the 4000 or 5000 range (this happens when the wrong firmware version is installed).
从屏幕左下方的左下方的齿轮图标开始,从传感器连接和软件打开,导航到校准窗口。在字段中键入“工厂”,然后按键盘上的Enter /返回键(校准因子将重新出现,下面的灰色部分将可用)。点击“更新固件”按钮。一个文件选择窗口应该打开,请选择文件“usb_quantum_v2.txt”并按照提示。如果显示的读数现在陷入零,则需要完成步骤8。